There will be parts that are revised and elaborated for better understanding, however, I hereby acknowledge that the following post is based on TensorFlow tutorial provided in:
For more detailed explanations and background knowledge regarding codes and dataset, you can always consult the link.
I. Introduction
What is Pandas Dataframe?
Personally, I think pandas dataframe is more straight forward or intuitive than NumPy array. Also, appending rows, selecting rows are strong points of Pandas so it is easier to edit your data.
Let’s briefly see how Pandas works through simple examples
1 —
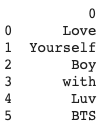
lst = [‘Love’, ‘Yourself’, ‘Boy’,‘with’, ‘Luv’, ‘BTS’]
df1=pd.DataFrame(lst)
print(df1)

2 —
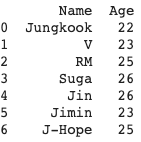
btsdata = {‘Name’:[‘Jungkook’, ‘V’, ‘RM’, ‘Suga’,’Jin’,’Jimin’,’J-Hope’],
‘Age’:[22, 23, 25, 26,26,23,25]}
df2=pd.DataFrame(btsdata)
print(df2)

Pandas Dataframe contains row and column and you can always define the titles of columns. Can you see that the pandas Dataframe has a very/exactly similar structure to CSV files?
Why do we want to load Pandas Data frame?
Actually we briefly had the taste of how Pandas is used! In Load CSV to Tensorflow post, I mentioned that before the tensorflow2.0 upgrade we used the following code to read csv files.
df = pd.read_csv(‘../input/iwildcam-2019-fgvc6/train.csv')
Fancy robot vacuum cleaners are out there, but we still use classic ones for a lot of reasons (except budget constraint). Same here! Although we have new and fancier method to load CSV file, we still have to or want to use the classic one.
Have you seen a smart automatic vacuum cleaner stuck between chair legs and looping under a dinner table whole night? Or you might not want to get a Roomba for plenty other reasons! :)👇🏼
So you have to know how to load CSV file through pandas dataset. Classics are classic.
Let’s begin! It will not take too long. ¡Ánimo!
II. Read Data Using Pandas
1 — Technical setup
from __future__ import absolute_import, division, print_function, unicode_literals

try:
  # %tensorflow_version only exists in Colab.
  %tensorflow_version 2.x
except Exception:
  pass
import pandas as pd
import tensorflow as tf
We are too familiar with this for now.
2 — Take A Look at our Dataset
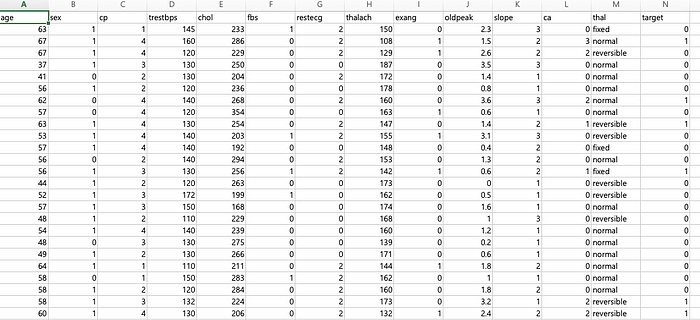
Our training dataset (heart.csv) has information about 303 patients regarding their personal health data(age,sex,etc). Then, in the end we want to predict whether a person with certain health information has a heart disease.

Since it is data used in medical studies we need some in-depth information on attributes not to be lost(but no stress here).
- sex: 1=male, 0=female
- cp: chest pain type
— Value 1: typical angina
— Value 2: atypical angina
— Value 3: non-anginal pain
— Value 4: asymptomatic
According to American Heart Association, angina is chest pain or discomfort caused when your heart muscle doesn’t get enough oxygen-rich blood. - trestbps: resting blood pressure (in mm Hg on admission to the hospital)
- chol: serum cholestoral in mg/dl
- fbs: fasting blood sugar
1 = > 120 mg/dl and 0 = if not - restecg: resting electrocardiographic results
— Value 0: normal
— Value 1: having ST-T wave abnormality (T wave inversions and/or ST elevation or depression of > 0.05 mV)
— Value 2: showing probable or definite left ventricular hypertrophy by Estes’ criteria - thalach: maximum heart rate achieved
- exang: exercise induced angina
1 = yes, 0 = no - oldpeak = ST depression induced by exercise relative to rest
- slope: the slope of the peak exercise ST segment
— Value 1: upsloping
— Value 2: flat
— Value 3: downsloping - ca: number of major vessels (0–3) colored by flourosopy
- thal: normal, fixed defect, reversable defect
- target: heart disease or not 1=yes, 0=no
This has been a long list of medical terminologies. It might help us understand what we are aiming for.
The list is based on the explanation provided by Cleveland Clinic Foundation for Heart Disease, for more information visit:
https://archive.ics.uci.edu/ml/datasets/heart+Disease
Plus, I hope all of you are physically and mentally healthy.
3 — Download the csv file
We have done this before in load CSV file post.
csv_file = tf.keras.utils.get_file('heart.csv', 'https://storage.googleapis.com/applied-dl/heart.csv')*Previously*
TRAIN_DATA_URL = “https://storage.googleapis.com/tf-datasets/titanic/train.csv"
train_file_path = tf.keras.utils.get_file(“train.csv”, TRAIN_DATA_URL)
4 — Read the CSV file using pandas
Have you ever had a long flight? My record was 15 hours (Incheon to Houston) and after 13hours I was about to die for boredom. The longest non-stop flight is offered by Singapore airlines from Singapore to New york (18h 25min!). Then I have a question for you. Are you going to take the direct flight or would you rather have a connecting flight in San Francisco or wherever?
Now our CSV file want to stopover on pandas dataframe before landing on tf.data.
df = pd.read_csv(csv_file)
df.dtypes
this returns,..
age int64
sex int64
,….
oldpeak float64
….
thal object
dtype: object
- oldpeak is float64 type. As you can see in the csv screenshot, they have decimal points (2.3,1.5,etc)
- thal is object type which means that they contain strings.
So, we want to convert that thal column (categorical data) to discrete numerical value.
df['thal'] = pd.Categorical(df['thal'])
df['thal'] = df.thal.cat.codes
df.head
III.Load Data Using tf.data.Dataset
Again, we are back at this stage, we are going to load pandas dataframe into tf.data.Dataset. This process allows us to move freely afterwards.
1 — Slice Data Frame
First, in our data frame we have feature columns and one target column. So, we want to take the target column apart from the data frame then it is naturally sliced into two.
target = df.pop('target')
target
0 0
1 1
2 0
3 0
4 0
5 0
….
df.valuesarray([[63., 1., 1., …, 3., 0., 2.],
.….
[63., 0., 4., …, 2., 3., 4.]])
2 — Combine the Pieces
Similar to what we did in NumPy case, we are using tf.data.Dataset.from_tensor_slices;
dataset = tf.data.Dataset.from_tensor_slices((df.values, target.values))for feat, targ in dataset.take(1):
  print ('Features: {}, Target: {}'.format(feat, targ))
Features: [ 63. 1. 1. 145. 233. 1. 2. 150. 0. 2.3 3. 0. 2. ], Target: 0
Here, we can see that our first row (and all the following rows) is well divided into features and target.
Remember our zip file analogy?
Although we zipped two docs files into one zip file, the two document files did not become one document file nor mixed as one file. They seem to be one file but not exactly one.

When you buy stamps in a sheet, there are dotted lines that make easier for you to cut. A sheet is a dataset, then each single stamp is your sliced tensors which still exists as one stamp so that you can cut one stamp out whenever you want to use one.
IV. Use the Dataset
1 — Shuffle and Batch the Dataset
train_dataset = dataset.shuffle(len(df)).batch(1)2 — Create and Train a Model
We are at the very last steps, for now we are aware of that. Do you feel a bit relieved?
[Create a Model and Compile]
def get_compiled_model():
  model = tf.keras.Sequential([
    tf.keras.layers.Dense(10, activation='relu'),
    tf.keras.layers.Dense(10, activation='relu'),
    tf.keras.layers.Dense(1, activation='sigmoid')
  ])

  model.compile(optimizer='adam',
                loss='binary_crossentropy',
                metrics=['accuracy'])
  return model
We defined get_compiled_model() which will create a dense layered model and compile them .
model = get_compiled_model()[Model Fitting]
model.fit(train_dataset, epochs=15)Unfortunately, in this tutorial, we do not have test dataset, so we do not have model evaluation step.
The last epoch of model fitting gives us ‘loss: 0.4360 — accuracy: 0.7954’. Imagine how would the accuracy be like if we had testing dataset.
This is all for loading pandas to Tensorflow. Hope you had fun.
Thank you for your interest.
Have a very pleasant day.
